"Sourdough for Cheaters" with Whipped Maldon Cinnamon Honey Butter
Truth be told, I am not a baker. I'm a home cook who ferociously loves food, and in these unprecedented times, I have found myself increasingly baking to fill my time and find some calm in the familiarity of my kitchen. I can imagine that if you are reading this, you're likely not a professional baker by trade and didn’t spend time in an apprenticeship at Poilane in Paris. Like me, you also don't own fancy baking tools like a lame or bannetons; to the contrary, you probably consider yourself lucky to have ANY flour on hand to bake bread, let alone a packet of instant yeast. And certainly, if you are a parent who is juggling work, home-life, homeschooling, and a regularly growing list of "I's" to dot and "T's" to cross, spending the traditional 24 hours babysitting a single loaf of bread just isn't going to happen!

Sourdough Loaf No. 3
I came into my new sourdough addiction rather unexpectedly. As I mentioned earlier, I am truly not a baker. With the buzz of sourdough starters taking over the internet, however, I dove in to learn about the traditional processes of bread making: making and maintaining a starter, preparing the lavein, autolyse the flour and water, folding and stretching, bench resting, proofing.... on and on! I realized about halfway through my first YouTube video I wasn't cut out for traditional bread making methods, at least not in a household with five members on lockdown! And, to make matters worse, using traditional methods I would have to toss at least half my sourdough starter after each feeding (unless I made bread with it daily), and in these times, that felt horribly wasteful!
So, back to the corner of my brain went any inkling of making traditional sourdough at home, and I persevered onward towards no-knead breads and other styles that used active dry yeast and didn’t require babysitting a starter. All that changed, though, when I posted a few photos on my Instagram account of some lovely milk rolls, and no-knead breads I was dabbling in, and received a message from a neighborhood friend asking if I'd like some of her family's 40-year-old sourdough starter. "YES, Please!" And just like that, I was back in the sourdough game.

Left: Just "fed" starter Right: Discard "unfed" starter
My first stop was a blogger friend of mine, TheGingered Whisk, who has an entire course on sourdough starters and a whole recipe section incorporating sourdough starter. Score!! Things escalated quickly as I went further downthe rabbit hole. The next thing I knew I had become a flour hoarder and was spending my time ravenously in search of specialty milled flours, and even ordered Apolina Poilane's latest book, Poilane (Poilane is the most revered bread maker of our time, and even our parent's and grandparent'stime). I drank up as much knowledge on social media as I could from some fantastic sourdough bread accounts like Michael Pollan from the Netflix series Cooked: Air, Erin Jean McDowell from the Food 52 series Bake It Up A Notch, Mike Greenfield from Pro Home Cooks, and Maurizio Leo from The Perfect Loaf. These are all fantastic resources for anyone wanting tocompletely nerd-out on bread making.

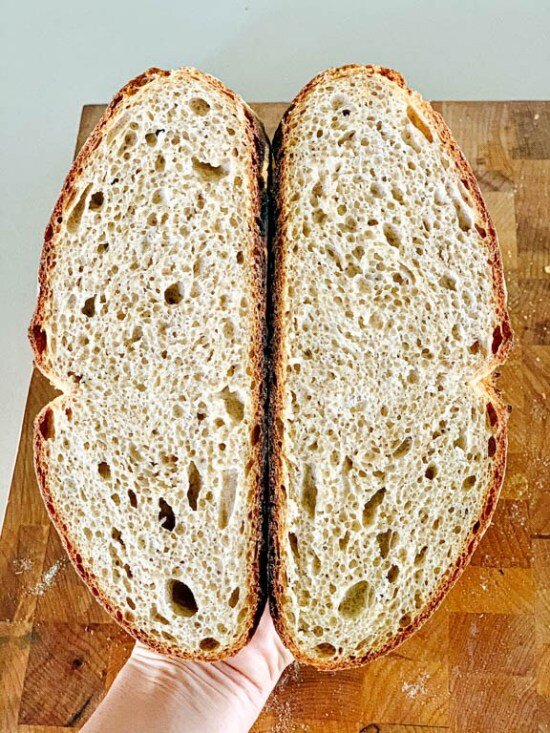
Not bad for a non-baker!
When I rose from my bread binge, I still felt as if I had just scratched the surface. I had developed a deep appreciation for these bakers, and the time they have each dedicated to their craft. True sourdough bread is an artistic labor of love that engages all of the senses to create something magical out of a few simple ingredients. However, for me, the home cook non-baker, I needed a simplified process. If I was going to make sourdough at home, two things needed to happen. First, I wanted to incorporate the discard or "unfed" starter so that I wasn't tossing it in the trash as much as possible to minimize waste. Second, the recipe needed to be sped up for people like me, the novice baker, while still yielding "sourdough-like" results.
Enter my idea for "Sourdough for Cheaters."
After doing some research, I stumbled upon a discard bread recipe from Mary Berg, and that became the rough draft for the recipe you see below. I have included tips I have learned from the traditional sourdough bread bakers I have listed above, along with some easy and inexpensive tools that will make your life so much easier. If you wish to make true sourdough bread without the shortcuts, I suggest following along the bakers I listed above.
But if you're like me and need a “cheat”, there are a few things you must have. Firstly, get yourself a flexible bench scraper. Good sourdough tends to be very hydrated and sticky, and a $1.99 flexible bench scraper will act as a non-stick hand. Secondly, have parchment paper and a large dutch oven with a lid. I use LeCruset, but Lodge makes a great dutch oven. Lastly, you need a sourdough starter- no exceptions. You can make your own or buy some off sites like Etsy, but the best method is to get some from a friend. Since many people are tossing half their starter while feeding, it's reasonable to ask a friend for some of their yeasty babies!

The process and aroma of bread baking in your home is like a warm hug from a friend, and an unconscious comfort we all need right now; regardless of how much time that loaf took to bake. I hope that my sourdough for cheaters is approachable enough for you to give your family that same embrace, while also saving you some precious time.
Sourdough Ingredients
2 1/4 - 2 3/4 cups of any combination UNBLEACHED baking flours (such as: bread, whole wheat,rye,all purpose, spelt ECT)
1 cup room temperature water
1 & 1/4 teaspoons dry active yeast such as Fleischmann's Red Star or Bob's Redmill
2 tsp sugar
2 tsp Diamond Crystal Kosher salt (use 1&1/2 tsp if using mortons or table salt)
1 cup "unfed" or "discard" sourdough starter (don't have 1 cup? see recipe note below)
Optional Bread Ingredients
¼ cup sesame seeds, cornmeal, or other grain for the final shaping process
Whipped Maldon Cinnamon Honey Butter
1 stick of salted butter, softened at room temperature
¼ cup honey
¼ tsp ceylon cinnamon
1 tsp Maldon flaked sea salt (1/2 tsp if using any other salt)
Make & Prep Your Sourdough For Cheater's Dough
It all starts with your sourdough starter! If you haven't "fed" your yeasty babies, save your discard for this recipe and add fresh flour and water to the remaining starter you're planning on keeping. If you have a food scale at home, I typically keep 50g of "unfed" starter and add 75g flour and 75g of water, and that seems to be the right size starter for me. If you don't have a food scale, no worries! Just discard half the volume and add 3/4-1 cup of flour and 1/2 cup of water. You really don't need to overcomplicate this! This "feeding and discarding" should happen daily if you're keeping your starter out on the counter, but if you park it in the fridge, most pros will tell you you can just feed and dump once a week to keep things alive.

2. Mix together your combination of unbleached baking flour(s) you have on hand:
-Start with 2 cups of flour if your discard starter is like a thick cake batter
-Start with 2 1/4 cups of flour if your discard starter is like a thin cake batter
-Start with 2 1/2 cups of flour if your discard starter is liquidy
(The recipe has a rather forgiving range of flour for a reason; everyone's starting with a different level of hydration in their starters! We can always adjust later! For this batch, I used 1 cup bread flour, 1 cup whole wheat flour, and 1/2 cup dark rye flour)
Using 100% unbleached all-purpose flour is totally okay for Cheater's Sourdough, but if you can get some bread flour, the gluten structure will be stronger.

3. If you have 30-60 minutes to let your water and flours "autolyse" (AKA, hangout all mixed together in a bowl to allow the flour to fully hydrate) that's ideal, but if you don't have that time just dump all the ingredients into your standing mixer. Again, a fully hydrated flour will yield stronger gluten structure (meaning better chewy airy bubbles in your finished bread), but it's not 100% required.
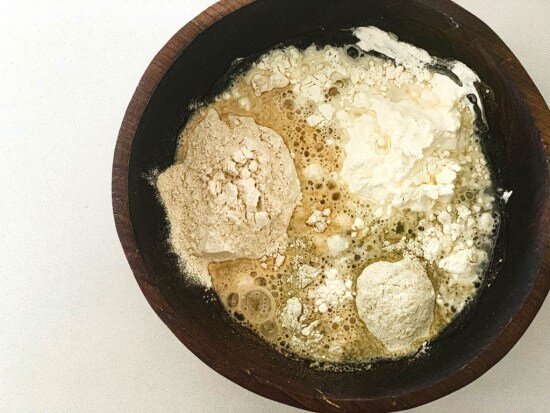
4. Once your water and flour(s) are in the mixer, add the instant yeast, sugar, salt, and sourdough discard*. If using a standing mixer, knead the dough with the dough hook attachment till the dough goes from a shaggy mess to a sticky, shiny, smooth batter. This will take approx 4-7 minutes depending on the speed of your mixer. I typically let my mixer run on medium to medium-high speed, and don't worry about "over-mixing" you actually WANT to really beat this dough! If you're mixing by hand, use a silicone spatula to avoid over sticking.
*Don't have a full cup of sourdough discard? Use up as much of your discard starter as you can, and supplement equal parts water and flour till you reach a full cup.

5. At this stage, you'll want your dough to be very tacky and sticky (ie. hydrated) to form those beautiful bubbles in the end product of your sourdough crumb. However, if you add more flour the dough will become springy and easier to handle, with a tighter and denser crumb structure. Equally delicious, and totally up to you!

6. Once your dough has finished kneading, spray a large bowl with non-stick cooking spray (at least double the size of your dough ball) and using a flexible bench scraper or silicone spatula remove dough from the mixing bowl (the scraper/spatula is TOTALLY necessary if you opted to keep your dough super sticky and hydrated! Whatever you do, don't try to pull the dough our with your bare hands! If you do, please post a photo of your hands so we can all enjoy the sticky mess!). If you opted to add more flour, your dough will be easier to handle and a bare hand is probably fine!

7. Cover the bowl with plastic wrap and let it hang out in a warm spot for 1-2 hours(till it doubles in size):
1 hour if your home is super warm (78 degrees or warmer)
1.5 hours if your home is JUUUUUUST right (71-77 degrees)
2 hours+ if your home is cold (70 degrees and below)

8. Just looks at those yeasty bubbles!

9. Sorry, one more of the bubbles!

10. Once your dough has risen, remove the top rack of your oven, and place your dutch oven (with oven-safe lid!) with a pizza stone or sheet tray rated for 450 degrees in the lower rack underneath (the stone/sheet tray helps displace the heat from the bottom of your dutch oven so not to burn your bottom crust!*). If you don't have something rated for 450 degrees, just use a few sheets of foil at the bottom of your oven. I know it seems weird to put empty stuff in your oven, but just do it! Let your dutch oven pre-heat for 30-60 minutes at 450 degrees.
*Concerned about burning? Double up your parchment, and/or coat the bottom of your loaf with coarse cornmeal.

11. Pull off a large piece of parchment paper (big enough to fit in your dutch oven and go fully up the sides of the pan), and dust lightly with flour. Punch down your risen dough, and using your flexible bench scraper or spatula, drop the dough on to the floured paper.
OK- it's time to put on your game face, and show this dough who's boss! With lightly floured, and swiftly confident fingers, fold and stretch the dough into the desired shape. If this seems too daunting, just give it a try, and keep your fingers lightly floured, and use your flexible bench scraper as a non-stick hand! You CAN do this! If you can get your dough into a tight ball seam-side down with some taught surface tension, and a light dusting of flour on the surface of your loaf, you are winning at life!
If you're planning on adding any sesame seeds, cornmeal, or any other grain to the bottom of your dough, now is the time to add that before placing your dough seam side down.
Hey, if your dough looks like an amoeba, don't stress! Any shape bread is going to taste great!
Cover your newly shaped loaf by inverting the proofing bowl over top, and let the dough rest for another 20-45+ minutes:
20 minutes if your home is super warm (78 degrees or warmer)
30 minutes if your home is JUUUUUUST right (71-77 degrees)
45 minutes+ if your home is cold (70 degrees and below)

12. After your last rise is complete, use a paring knife to "score" the top of your bread. I usually opt for a swooping line in the middle of my dough, but go wild! Get creative! This step is not only decorative, but it also helps guide your bread how and where to expand while cooking.

Bake Your Sourdough For Cheaters Dough
13. Brush off any excess flour from your parchment paper, and USING OVEN MITTS carefully slide out the rack of your oven about 1/2 way and remove the lid of your screaming-hot dutch oven, and plop your scored dough (with the paper!) into the dutch oven. USING OVEN MITTS carefully place the lid back on and bake covered at 500 degrees for 20 minutes.
14. After 20 minutes, USING OVEN MITTS, carefully remove the lid of your dutch oven and place it somewhere in your kitchen NO ONE WILL TOUCH! Tada! Isn't your loaf so pretty already? Reduce the heat to 400 degrees and bake for an additional 20 minutes. The crust should look very firm and hard! After the first 20 minutes, you may think your bread is already fully cooked. Trust me, it's not!

15. After the bread has baked uncovered, turn the oven off and leave the door cracked open to "cure" the crust to get the outside extra crisp for 15 minutes. You can also remove your dutch oven from your oven WITH OVEN MITTS and let it sit in the hot dutch oven on top of your stove as long as no one touches your pot!

16. Once your bread has "cured" let it sit out in the open air for at least an hour on a cutting board. I know, you will want to cut into this freshly baked loaf of love, but PLEASE DON'T! Bread needs to cool so that the internal crumb structure doesn't deflate or get gummy. Trust me, your patience will be rewarded. Plus your hot loaf needs time to dissipate all that internal heat and further crisp up the exterior crust.
Make Maldon Cinnamon Honey Butter
17. While you're waiting, now is a great time to whip up some super addictive butter! Mix 1 softened stick of salted butter with 1/4 cup of honey, 1/4 tsp cinnamon, and 1 tsp of Maldon sea salt (1/2 tsp if using regular kosher salt or table salt).

18. Whip using the whisk attachment of a standing mixer, or hand mixer.

19. Your sourdough bread will last for about 4 to 5 days at normal room temperature and would benefit from a light toasting after day two. But who's bread is really going to last that long in a house full of hungry eaters? Enjoy!
